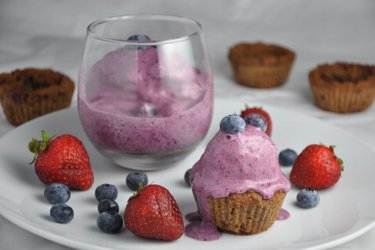
Protein Ice Cream in Chickpea Cones
Would you believe that the dessert in the picture could be healthy? I am introducing you to this healthy dessert that contains protein powder and no cream, flour, or sugar. It looks great on a plate and tastes even better! Spoil yourself with this delicious and healthy protein ice cream in chickpea cones and your day will be better right away.
I adore protein ice cream and I prepare it quite often during the summer. Depending on what fruit and flavor of the protein I use, I can change its taste all the time. In this recipe I prefer to use vanilla or coconut protein. This will give a high amount of protein to ice cream, and thanks to its beneficial nutritional values, this ice cream will not harm your figure either. This protein ice cream is sweet enough, so you don't need to add any sugar or honey into it. However, if you are used to sweeter ice creams, just add a little bit of stevia into it. Even though this fitness ice cream is completely free of heavy cream, it is irresistibly creamy and delicious. It is best to prepare ice cream right away before serving and not storing it in the freezer.
And, as an extra bonus, we serve this protein ice cream in playful and healthy chickpea cones, that you can eat at the end. Great, isn't it? They are easy to prepare and will add the ultimate oomph to the recipe.
Ingredients
- Cones (12 pieces):
- 250g (8.8oz) cooked chickpeas (130g (4.6oz) raw chickpeas or 1 can)
- ½ cup oats (I recommend these)
- 120g (4.2oz) dates (or 5 Tbsp honey) (I recommend these)
- 30g (1oz) applesauce
- 2 Tbsp coconut oil (I recommend this one)
- 1 Tbsp vanilla extract
- 1 Tbsp baking powder
- 40g (1.4oz) dark chocolate chips (I recommend this one)
- raw beans or macaroni (to fill cones)
- Ice Cream:
- 2 cup frozen berries
- ½ cup protein powder (vanilla/fruit flavor)
- 5 Tbsp milk (of your choice)
- stevia (optional) (I recommend this one)
- vanilla extract (optional)
Instructions
- In a blender, blend all cone ingredients together (except chocolate chips and beans) until smooth.
- After blending, fold in chocolate pieces and put into muffin cups.
- If you’re not using silicone cups, brush cups with some oil.
- Press dough in cups with a spoon in the shape of bowls – make a hole in the middle and then fill this hole with dry beans or macaroni so they won’t rise during baking.
- This step may be omitted if you don’t have time to do it- in which case you’ll just have flat muffins to place the ice cream on.
- Bake cones at 180 degrees Celsius (350 °F) for 18 to 25 minutes until brown.
- After taking out of the oven, don’t remove from the cups; let them sit for approximately 20 minutes.
- You can eat the baked cones immediately or you can place them into the refrigerator overnight – they will be firmer that way.
- Prepare ice cream right away before eating- the taste and consistency is the best at that time.
- If you don’t have flavored and sweetened protein powder, I recommend adding chosen sweetener to taste, and a bit of vanilla extract.
- In a bowl, blend all ice cream ingredients with a hand blender until smooth.
- Spoon ice cream into chickpea cones, you can pour dark chocolate over, or sprinkle with cocoa nibs and fruit.
| Preparation time | 40 minutes | |
| Yields | 12 servings |
| Nutritional information / 1 serving | ||
| Calories | 124 Kcal | |
| Carbohydrates | 14 g | |
| Fiber | 4 g | |
| Proteins | 5 g | |
| Fat | 4 g | |
For more related recipes, click on the categories below
Sugar-FreeHigh FiberLow CalorieVeganProtein PowderNut-FreeVegetableLegumesSugar-Free Dessert RecipesProtein Powder Dessert RecipesLow Fat Dessert RecipesDairy-Free Dessert RecipesHealthy Nut-Free Dessert RecipesHigh Protein Oat RecipesLow Calorie Oat Recipes for Weight LossProtein Powder Recipes with OatsDairy-Free Oat RecipesLow Calorie Vegetable Recipes for Weight Loss
I am a fit food wizard nutritionist and I conjure up these healthy and tasty fitness recipes.
My goal is to show you that eating healthy can be easy-breezy.
